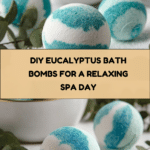
Easy Homemade Eucalyptus Bath Bombs Recipe
Introduction
Unwind and refresh with these easy homemade eucalyptus bath bombs. They fizz delightfully in warm water, releasing soothing eucalyptus aroma perfect for a relaxing soak after a long day.

Ingredients
- 2 cups (260 g / 9.2 oz) baking soda (sodium bicarbonate)
- 1 cup (125 g / 4.4 oz) citric acid
- 1/2 cup (65 g / 2.3 oz) Natrasorb Bath
- 1/2 – 2/3 cup (120 – 150 ml / 4 – 5 fl oz) isopropyl alcohol in a spritz bottle
- 2.5 g (0.08 oz / 50 drops) eucalyptus essential oil
- 1/4 tsp green spirulina powder (optional)
Instructions
- Step 1: In a medium mixing bowl, combine Natrasorb Bath and eucalyptus essential oil. Whisk well until fully blended.
- Step 2: Sieve baking soda and citric acid into the same bowl. Stir the mixture thoroughly to combine all dry and wet ingredients evenly.
- Step 3: Using a spritz bottle, lightly spray the mixture with isopropyl alcohol a little at a time. Stir and break down lumps as you go. Add alcohol gradually to prevent premature fizzing. The mixture should resemble damp sand and hold its shape when pressed.
- Step 4: Optional: Divide the mixture into two bowls. Add 1/4 to 1/2 teaspoon of spirulina powder to one bowl and mix well to create a green tint.
- Step 5: Loosely overfill both halves of the bath bomb molds with the white and green mixtures alternately, creating a heap in the center. Press the molds together firmly, but avoid packing tightly to prevent breakage.
- Step 6: Tap the mold gently with a spoon, then carefully separate the halves. Remove the bath bomb and place it on a tray lined with bubble wrap. Handle with care as they are fragile at this stage.
- Step 7: Let the bath bombs dry for 24 to 48 hours until fully hardened. Once dry, wrap each bomb in plastic wrap or cling film and store in an airtight container.
- Step 8: When ready to use, fill your bathtub with warm water and drop in one or two eucalyptus bath bombs for a relaxing experience.
Tips & Variations
- Use a spritz bottle for better control when adding liquid; too much at once can cause the mixture to fizz prematurely.
- To create colorful layers, add natural colorants like spirulina powder or beetroot powder to portions of the mixture.
- Avoid packing the molds tightly to prevent cracking when removing bath bombs.
- Essential oils can be varied to lavender, peppermint, or chamomile for personalized scents.
Storage
Store the bath bombs wrapped in plastic and placed inside an airtight container to prevent moisture exposure. They can last up to six months when stored in a cool, dry place. Use within this time for best fizz and fragrance. Reheating is not necessary or recommended as bath bombs dissolve fully in water.
How to Serve

Serve this delicious recipe with your favorite sides.
FAQs
Can I use other essential oils instead of eucalyptus?
Yes, you can substitute eucalyptus with any essential oil you prefer, such as lavender, peppermint, or chamomile, to customize the scent and benefits.
What if my bath bombs crumble after drying?
This often happens if the mixture was packed too loosely or dried too quickly. Try gently pressing the mixture more firmly in the molds and ensure a drying environment that’s not too dry or humid. Also, avoid using too much liquid during mixing.
PrintEasy Homemade Eucalyptus Bath Bombs Recipe
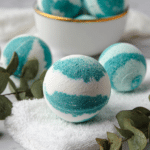
Create your own soothing eucalyptus bath bombs at home with this simple, easy-to-follow recipe. These fizzy bath bombs combine baking soda, citric acid, and eucalyptus essential oil for a refreshing and relaxing bathing experience. The addition of spirulina powder gives a refreshing color twist, making your bath time both calming and visually appealing.
- Prep Time: 15 minutes
- Cook Time: 0 minutes
- Total Time: 24-48 hours drying time
- Yield: Approximately 8–10 bath bombs depending on mould size 1x
- Category: Bath & Body
- Method: No-Cook
- Cuisine: N/A
Ingredients
Dry Ingredients
- 2 cups / 260 g / 9.2 oz baking soda (sodium bicarbonate)
- 1 cup / 125 g / 4.4 oz citric acid
- 1/2 cup / 65 g / 2.3 oz Natrasorb Bath
- 1/4 tsp green spirulina powder (optional)
Wet Ingredients
- 1/2 – 2/3 cup / 120 – 150 ml / 4 – 5 fl oz Isopropyl alcohol in a spritz bottle
- 2.5 g / 0.08 oz / 50 drops eucalyptus essential oil
Instructions
- Mix Wet Ingredients: In a medium mixing bowl, combine the Natrasorb Bath and eucalyptus essential oil. Whisk them together thoroughly to ensure the essential oil is evenly distributed through the absorbent base.
- Add Dry Ingredients: Sieve the baking soda and citric acid into the same mixing bowl. Stir all ingredients together until well combined to ensure a uniform mixture, which is key for consistent fizzing.
- Spritz with Alcohol: Gradually spritz the mixture with isopropyl alcohol a little at a time. Stir and break down any lumps continuously. Adding the alcohol slowly prevents premature fizzing and dissolving, allowing the mixture to develop the texture of damp sand that can hold its shape when pressed.
- Add Color (Optional): If desired, divide the mixture evenly into two bowls. Tint one bowl with 1/4 to 1/2 teaspoon of spirulina powder to add a natural green color to your bath bombs.
- Fill the Moulds: Loosely overfill both halves of each bath bomb mould with the mixture, creating a mound. Alternate layers of white and green mixture to create a marbled effect. Press the mould halves firmly together and brush off any excess mixture around the edges.
- Unmould Carefully: Tap the mould gently with a spoon, lift one half of the mould, then turn the bath bomb over to remove the other half. Place the bath bombs on a tray lined with bubble wrap to protect them from breaking as they dry.
- Dry the Bath Bombs: Let the bath bombs air dry for 24 to 48 hours until they harden completely. Once dry, seal each bath bomb in plastic wrap or cling film and store them in an airtight container to preserve freshness and fizz.
- Usage: When ready to use, fill your bathtub with warm water and add one to two eucalyptus bath bombs for a refreshing, aromatic bathing experience.
Notes
- Work with your hands during mixing to better assess the texture; aim for a consistency similar to damp sand that holds its shape when pressed.
- Adding too much liquid at once causes the bath bombs to fizz prematurely and dissolve, so spritz alcohol gradually.
- Overfilling the moulds loosely is better than packing tightly to avoid breakage when unmoulding.
- Handle freshly unmoulded bath bombs carefully as they are fragile while drying.
- Store dried bath bombs in an airtight container to maintain their fizz and prevent moisture absorption.
- Using natural spirulina powder adds a beautiful color without synthetic dyes.
Keywords: Eucalyptus bath bomb, homemade bath bombs, natural bath fizzies, DIY bath bombs, aromatherapy bath, spirulina bath bombs