Chocolate Mint Cake Recipe
Introduction
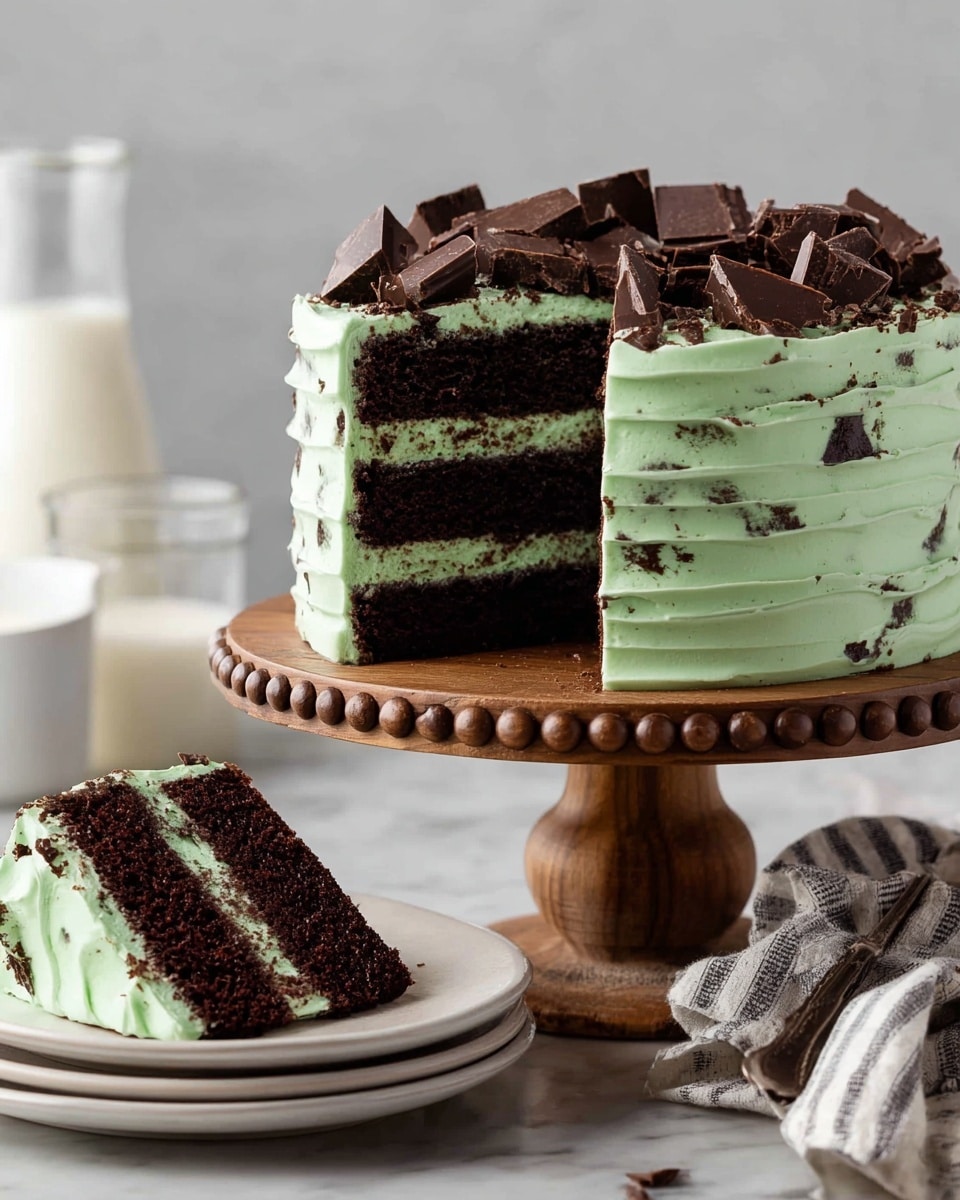
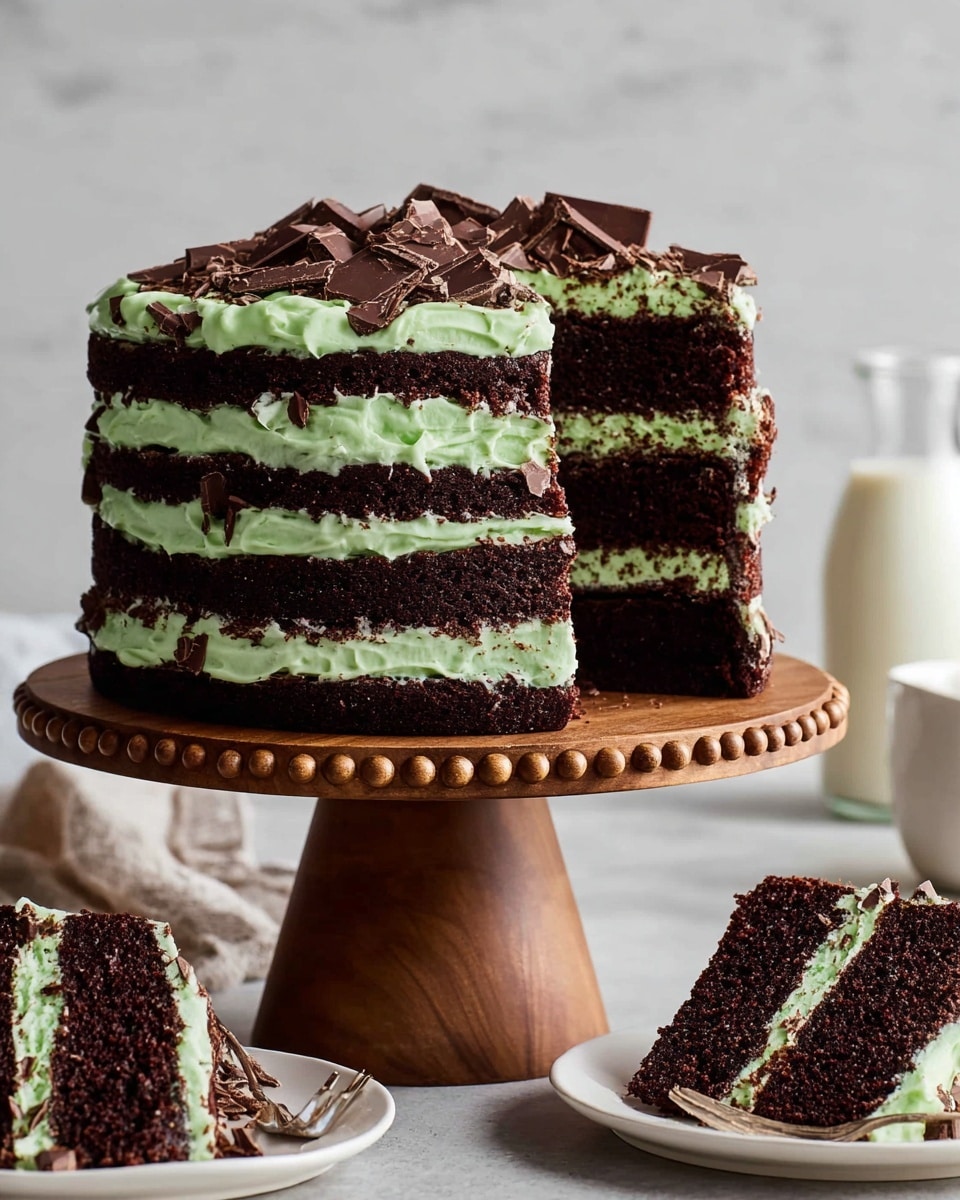
This Chocolate Mint Cake is a rich, moist chocolate cake layered with a fluffy chocolate chip mint frosting. The combination of dark chocolate and cool peppermint creates a refreshing twist on a classic dessert that’s perfect for any celebration.
Ingredients
- 2 1/2 cups all-purpose flour
- 1 cup Dutch process cocoa powder
- 1 3/4 cups white granulated sugar
- 2 1/2 tsp baking powder
- 1 1/2 tsp baking soda
- 1 tsp salt
- 3/4 cup oil (canola or vegetable)
- 2 tsp pure vanilla extract
- 4 large eggs (room temperature)
- 1 1/4 cups buttermilk (room temperature)
- 1 cup hot water
- 2 1/2 cups unsalted butter (slightly cold)
- 7 1/2 cups powdered sugar
- 1 tsp peppermint extract
- 1 tsp pure vanilla extract
- 1/2 tsp salt
- 1/2 cup heavy cream
- Food dye (blue, green, brown)
- 4 oz semisweet chocolate bar (chopped into small pieces)
- 2 packages of Andes Mints (40 bars for filling, rest for decoration)
Instructions
- Step 1: Preheat the oven to 350°F. Spray three 8-inch cake pans with baking nonstick spray, line the bottoms with parchment circles, and spray again.
- Step 2: In a large bowl, sift together flour and cocoa powder. Whisk in sugar, baking powder, baking soda, and salt. Set aside.
- Step 3: Heat the water on the stove until steaming. In a separate bowl, whisk together oil, vanilla, buttermilk, and eggs. Slowly add the hot water while whisking.
- Step 4: Pour the wet ingredients into the dry and mix until just combined.
- Step 5: Divide the batter evenly among the prepared pans. Bake for 24–27 minutes, or until a toothpick inserted in the center comes out with moist crumbs or clean.
- Step 6: Let the cakes rest in the pans for 10 minutes, then transfer to a wire rack to cool completely.
- Step 7: For the frosting, let butter sit slightly cold on the counter for 30 minutes. Sift powdered sugar. Chop the semisweet chocolate into small pieces, discarding any dust.
- Step 8: Beat the butter on high speed for 3 minutes until fluffy. Gradually add powdered sugar; the mixture will be very thick.
- Step 9: Mix in peppermint extract, vanilla extract, salt, and heavy cream on low speed until combined, then beat on high for 2 minutes, scraping the bowl halfway through.
- Step 10: Add 2 drops of green food dye and beat on high, then add 1 drop blue dye and beat again. To soften the green color, add a tiny drop of brown and mix thoroughly.
- Step 11: Fold the chopped chocolate pieces into the frosting using a rubber spatula.
- Step 12: Place cake layers in the freezer for 15 minutes to firm up. If domed, use a serrated knife to level the tops. Chop 40 Andes mints (about 1 cup) for the filling while chilling.
- Step 13: Place a small amount of frosting on your cake board to secure the first layer. Lay the first cake layer down.
- Step 14: Spread 1 cup of frosting evenly over the first layer using an offset spatula, then pipe a border around the edge. Sprinkle half the chopped mints inside the border.
- Step 15: Repeat with the second layer and remaining chopped mints. Place the final layer upside down for a flat top.
- Step 16: Apply a thin crumb coat of frosting. Freeze the cake for 15 minutes, then finish frosting the entire cake smoothly.
- Step 17: To create a swirl pattern, gently press an offset spatula against the cake while spinning it on a turntable, encouraging the frosting to swirl upward.
- Step 18: Decorate the top of the cake with extra chopped Andes mints if desired.
Tips & Variations
- Use room temperature ingredients to ensure smooth batter and frosting consistency.
- Adjust peppermint extract to taste if you prefer a stronger or milder mint flavor.
- For a more intense chocolate flavor, use high-quality Dutch-process cocoa and semisweet chocolate.
- Food dye can be omitted or replaced with natural colorings for a subtler look.
- Freeze the cake layers before frosting to reduce crumbs and make assembly easier.
Storage
Store the cake covered in the refrigerator for up to 4 days. Bring to room temperature before serving for the best texture. Leftovers can be wrapped tightly and frozen for up to 2 months; thaw overnight in the refrigerator before serving.
How to Serve
Serve this delicious recipe with your favorite sides.
FAQs
Can I make this cake without Andes Mints?
Yes, you can omit the Andes Mints or substitute with chopped peppermint candies or chocolate chips for a similar effect.
Can I prepare the cake in advance?
Absolutely. You can bake the cake layers a day ahead and keep them wrapped tightly in the fridge. The frosting can also be made a day in advance and stored covered at room temperature or in the fridge.
PrintChocolate Mint Cake Recipe

This rich and decadent Chocolate Mint Cake combines moist cocoa-infused layers with a luscious chocolate chip mint frosting. The cake is perfectly balanced with the refreshing taste of peppermint, complemented by chopped Andes mints folded into the fluffy frosting. Ideal for chocolate lovers seeking a cool minty twist, this dessert is beautifully decorated with extra mint candies, making it perfect for celebrations or special occasions.
- Prep Time: 30 minutes
- Cook Time: 27 minutes
- Total Time: 1 hour 30 minutes
- Yield: 12 servings 1x
- Category: Dessert
- Method: Baking
- Cuisine: American
Ingredients
Cake
- 2 1/2 cups All-purpose flour
- 1 cup Dutch process cocoa powder
- 1 3/4 cup White granulated sugar
- 2 1/2 tsp Baking powder
- 1 1/2 tsp Baking soda
- 1 tsp Salt
- 3/4 cup Oil (canola or vegetable)
- 2 tsp Pure vanilla extract
- 4 Large eggs (room temperature)
- 1 1/4 cup Buttermilk (room temperature)
- 1 cup Hot water
Frosting
- 2 1/2 cups Unsalted butter (slightly cold)
- 7 1/2 cups Powdered sugar
- 1 tsp Peppermint extract
- 1 tsp Pure vanilla extract
- 1/2 tsp Salt
- 1/2 cup Heavy cream
- Food dye (blue, green, brown)
- 4 oz Semisweet chocolate bar (chopped small pieces, e.g. Lindt 70%)
- 2 Packages of Andes Mints (40 bars for filling, remaining for decoration)
Instructions
- Preheat and Prepare Pans: Preheat your oven to 350°F. Spray three 8-inch cake pans with baking nonstick spray and line the bottoms with parchment paper circles, spraying again to ensure nonstick surfaces.
- Combine Dry Ingredients: In a large bowl, sift together the all-purpose flour and Dutch process cocoa powder. Whisk in the granulated sugar, baking powder, baking soda, and salt thoroughly. Set this dry mixture aside.
- Prepare Wet Ingredients: Heat water on the stove until steaming. In another bowl, whisk together oil, vanilla extract, buttermilk, and eggs. Slowly add the hot water to this mixture while whisking gently to combine.
- Mix Batter: Pour the wet ingredients into the dry ingredients and mix until just combined, being careful not to overmix to keep the cake tender.
- Bake the Cake: Evenly divide the batter among the three prepared pans and bake in the preheated oven for 24-27 minutes. To check doneness, insert a toothpick in the center; it should come out clean or with moist crumbs.
- Cool Cakes: Let the cakes rest in the pans for 10 minutes after baking, then transfer to a wire rack to cool completely before frosting.
- Prepare Frosting: Allow butter to sit out for 30 minutes to slightly soften. Sift powdered sugar. Chop the semisweet chocolate into small pieces, discarding any excess dust.
- Beat Butter: Using a mixer, beat the softened butter on high speed for about 3 minutes until very fluffy.
- Add Sugar and Flavorings: Gradually add the powdered sugar to the butter, mixing until thickened. Then add peppermint extract, vanilla extract, salt, and heavy cream. Beat on low until blended, then beat on high for 2 minutes, scraping down the sides halfway through. The frosting should be light and fluffy.
- Color the Frosting: Add two drops of green food dye and beat on high until combined. Add one drop of blue and beat again; add a tiny drop of brown to tone down the green color and mix thoroughly.
- Fold in Chocolate Chips: Gently fold the chopped semisweet chocolate pieces into the frosting with a rubber spatula.
- Chill Cake Layers: Place the cooled cake layers in the freezer for 15 minutes to firm up. If domed, level the cakes with a serrated knife for even stacking.
- Chop Mint Candies: While cakes chill, chop 40 Andes mints to yield about 1 cup for the filling.
- Secure Cake Base: Put a small amount of frosting on your cake board or serving plate to keep the cake in place during assembly.
- First Layer and Filling: Place the first cake layer down and spread 1 cup of frosting evenly across it with an offset spatula. Pipe a border of frosting around the edges. Sprinkle half of the chopped Andes mints over the frosting.
- Second Layer and Filling: Add the second layer of cake and repeat the frosting and mint sprinkle process.
- Top Layer: Place the last cake layer upside down (bottom facing up) for a flat top surface.
- Crumb Coat and Chill: Apply a thin crumb coat layer of frosting to trap any loose crumbs. Freeze for 15 minutes to set.
- Final Frosting: Apply the final coat of frosting smoothly over the entire cake.
- Create Swirl Decoration: Using an offset spatula and cake turntable, gently press and spin the cake to create a swirling texture that rises as you turn.
- Decorate with Mints: Finish by topping the cake with extra chopped Andes mints for an elegant and minty garnish.
Notes
- Make sure all the wet ingredients are at room temperature for better mixing and texture.
- Sifting the cocoa powder and flour helps to avoid lumps and promotes a light cake crumb.
- Be careful not to overmix the batter to keep the cake moist and tender.
- Using high-quality Dutch process cocoa enhances the chocolate flavor and richness.
- To prevent frosting from coloring too bright, adjust food dye quantities gradually.
- Chilling the cake layers makes them easier to handle and helps in achieving neat layers.
- The upside-down placement of the top layer ensures a flat surface for frosting and decoration.
Keywords: Chocolate cake, Mint cake, Chocolate mint frosting, Andes mints cake, Layer cake, Chocolate dessert