Candy Cane Mousse Cake Recipe
Introduction
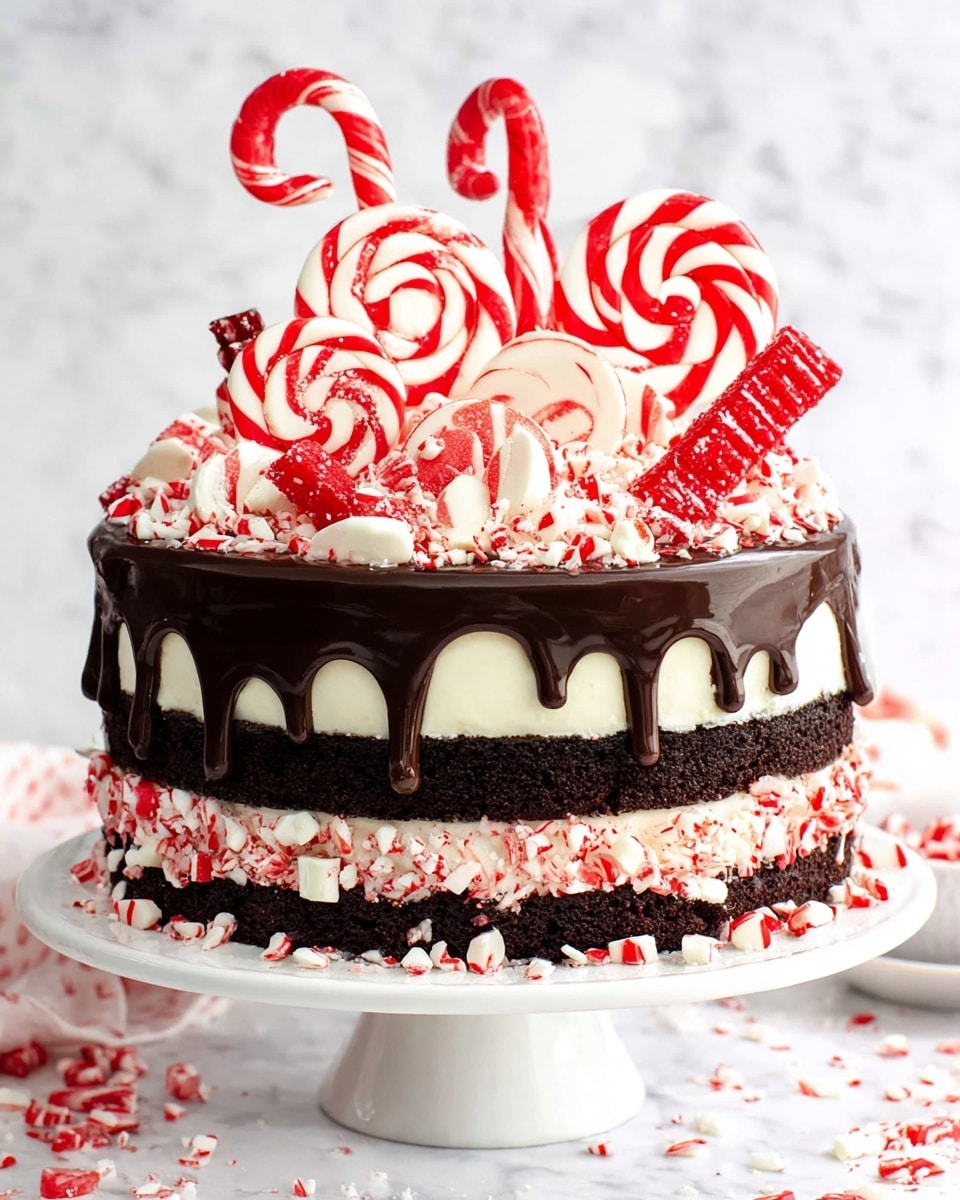
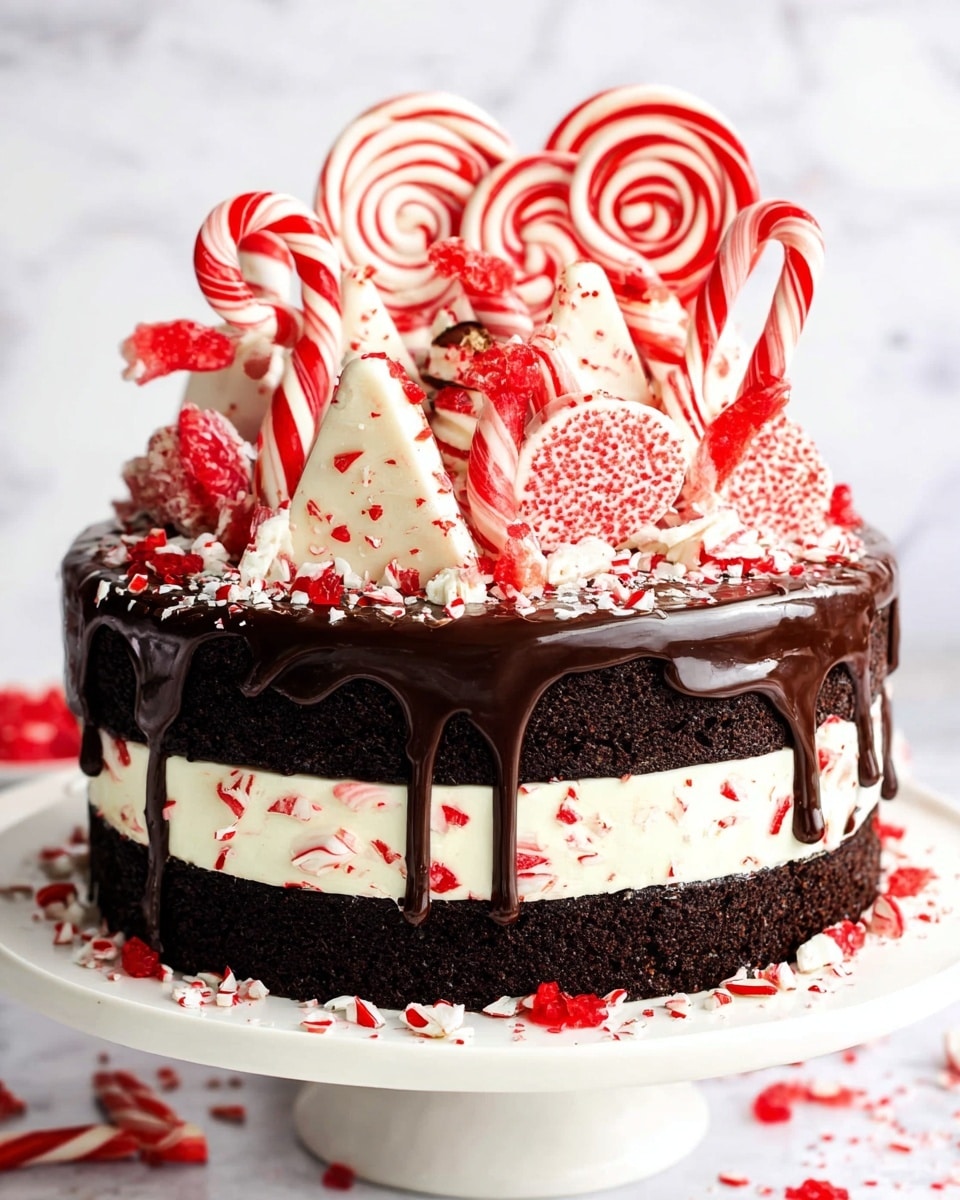
This Candy Cane Mousse Cake is a festive and elegant dessert, combining rich chocolate cake layers with light peppermint mousse. Topped with a glossy chocolate ganache and decorated with peppermint candies, it’s perfect for holiday celebrations or any time you want a special treat.
Ingredients
- 4 oz unsalted butter (at room temperature)
- 3.5 oz granulated sugar (1/2 cup)
- 3.75 oz brown sugar (1/2 cup)
- 2 large eggs (at room temperature)
- 2 tsp vanilla extract
- 8 fl oz buttermilk (1 cup, at room temperature)
- 5.3 oz all-purpose flour (1 1/3 cups)
- 2 oz unsweetened cocoa powder (2/3 cup)
- 1 tsp baking soda
- 1/2 tsp salt
- 18 oz white chocolate chips
- 3.5 cups heavy cream
- ½ tsp salt
- 4 tsp unflavored powdered gelatin
- 4 TBSP water
- 1 tsp peppermint extract
- 8 oz Andes peppermint crunch baking bits (1 1/3 cup, or similar chocolate-mint pieces)
- 4 fl oz heavy cream (1/2 cup)
- 3 oz semi-sweet chocolate (finely chopped)
- Peppermint candies (peppermint bark, lollipops, ribbon candy, candy canes, etc.)
Instructions
- Step 1: Preheat the oven to 350°F. Line two 9-inch cake pans with parchment paper; do not spray with nonstick spray.
- Step 2: In a large stand mixer fitted with a paddle attachment, beat butter and both sugars on medium-high speed until light and fluffy, about 5 minutes. Add eggs one at a time, beating well after each. Mix in vanilla extract until incorporated.
- Step 3: In a separate bowl, sift together flour, cocoa powder, baking soda, and salt. With mixer on low, add a quarter of the sifted dry ingredients, then a third of the buttermilk. Continue alternating dry and wet ingredients, ending with dry. Stop mixer, scrape sides and bottom, and finish mixing by hand.
- Step 4: Divide batter evenly between pans, smoothing the tops. Bake 22–25 minutes until a toothpick comes out with a few moist crumbs. Cool completely. Cakes can be frozen if not using immediately.
- Step 5: Prepare a 9-inch cake pan with removable bottom or springform pan lined with a 4-inch high acetate collar or foil strip that overlaps and extends slightly above the pan’s sides.
- Step 6: Place a cake cardboard in the bottom, then carefully set one cake layer on top.
- Step 7: For the first mousse layer, microwave 9 oz white chocolate, 3/4 cup cream, and 1/2 tsp salt in 30-second bursts, stirring until smooth. Cool to room temperature, stirring occasionally.
- Step 8: Whisk 2 tsp gelatin with 2 TBSP cold water; let absorb. Microwave gelatin 10–15 seconds until melted. Whisk melted gelatin into chocolate mixture along with 1/2 tsp peppermint extract.
- Step 9: Whip 1 cup heavy cream to firm peaks. Fold half into chocolate mixture, then fold in remaining cream. Stir in 2/3 cup Andes peppermint pieces.
- Step 10: Spread mousse evenly over cake layer. Refrigerate 15 minutes until mousse is just set.
- Step 11: Place second cake layer onto mousse. Repeat mousse process for second layer and spread over cake. Refrigerate 5–6 hours or overnight until mousse is firm.
- Step 12: Remove cake from pan, unwrap acetate. To make ganache, heat 1/2 cup cream to simmer and pour over chopped semi-sweet chocolate. Whisk until smooth and shiny.
- Step 13: Pour ganache over cake, spreading to edges with a spatula to form drizzles. Let set 10 minutes.
- Step 14: Decorate with peppermint candies of your choice. Add candy no more than 1–2 hours before serving to prevent stickiness.
- Step 15: For clean slices, chill cake well and use a sharp knife dipped in hot water and wiped clean between cuts. Let slices sit at room temperature for 10–15 minutes before serving.
Tips & Variations
- Use a cake pan with a removable bottom or a springform pan to easily release the mousse cake without damage.
- Try substituting Andes peppermint bits with crushed candy canes or peppermint bark for added texture.
- If you don’t have acetate cake collars, aluminum foil strips work well; just be sure they extend above the pan to contain the mousse.
- Make the cake layers a day ahead and keep frozen until ready for mousse assembly to save time on serving day.
- For a stronger peppermint flavor, add a few extra drops of peppermint extract to the mousse, but don’t overdo it to avoid bitterness.
Storage
Store the assembled cake covered in the refrigerator for up to 3 days. If you’ve frozen the cake layers beforehand, assemble and consume the mousse cake within 24 hours of thawing. Keep the cake chilled for best mousse texture, and cover it lightly with plastic wrap or a cake dome to prevent drying. Leftover slices can be reheated slightly at room temperature for 10–15 minutes before serving for ideal flavor and mouthfeel.
How to Serve
Serve this delicious recipe with your favorite sides.
FAQs
Can I make this cake without gelatin?
Gelatin helps the mousse set firmly and hold its shape. Without it, the mousse will be softer and less stable. You might consider alternative stabilizers like agar-agar, but results can vary.
What can I use if I don’t have buttermilk?
To substitute buttermilk, mix 1 cup of milk with 1 tablespoon of white vinegar or lemon juice. Let it sit for 5–10 minutes before using in the recipe.
PrintCandy Cane Mousse Cake Recipe

This Candy Cane Mousse Cake is a festive and indulgent holiday dessert featuring layers of rich chocolate cake and peppermint-infused white chocolate mousse. The cake is coated with a smooth chocolate ganache and decorated with an assortment of peppermint candies for a perfect seasonal treat. Its creamy mousse layers combined with moist chocolate cake make it an impressive yet approachable centerpiece for Christmas celebrations.
- Prep Time: 30 minutes
- Cook Time: 25 minutes
- Total Time: 7 hours 55 minutes (includes chilling time)
- Yield: 12 servings 1x
- Category: Dessert
- Method: Baking
- Cuisine: American
Ingredients
Chocolate Cake
- 4 oz unsalted butter (at room temperature)
- 3.5 oz granulated sugar (1/2 cup)
- 3.75 oz brown sugar (1/2 cup)
- 2 large eggs (at room temperature)
- 2 tsp vanilla extract
- 5.3 oz all-purpose flour (1 1/3 cup)
- 2 oz unsweetened cocoa powder (2/3 cup)
- 1 tsp baking soda
- 1/2 tsp salt
- 8 fl oz buttermilk (1 cup, at room temperature)
Candy Cane Mousse
- 18 oz white chocolate chips
- 3.5 cups heavy cream
- 1/2 tsp salt
- 4 tsp unflavored powdered gelatin
- 4 TBSP water
- 1 tsp peppermint extract
- 8 oz Andes peppermint crunch baking bits (1 1/3 cup, or similar chocolate-mint pieces)
Ganache and Decoration
- 4 fl oz heavy cream (1/2 cup)
- 3 oz semi-sweet chocolate (finely chopped)
- Peppermint candies (peppermint bark, lollipops, ribbon candy, candy canes, etc.)
Instructions
- Prepare the Chocolate Cake: Preheat your oven to 350°F (175°C). Line two 9-inch cake pans with parchment paper without spraying them. In a stand mixer with paddle attachment, cream the room temperature butter and both sugars on medium-high speed until light and fluffy, about 5 minutes. Add the eggs one at a time, mixing well after each addition. Mix in the vanilla extract fully.
- Mix Dry and Wet Ingredients: In a separate bowl, sift together flour, cocoa powder, baking soda, and salt. Gradually add the dry ingredients in quarters to the mixer on low speed, alternating with thirds of the buttermilk, beginning and ending with the dry ingredients. Stop mixing when almost combined, then finish folding gently by hand to avoid overmixing.
- Bake the Cake Layers: Divide batter evenly between the pans and smooth the tops. Bake for 22-25 minutes until a toothpick inserted comes out with few moist crumbs. Cool cakes completely on a wire rack. Cakes can be frozen for weeks if needed.
- Prepare the Cake Assembly Pan: Use a 9-inch pan with at least 3-inch sides and a removable bottom or springform pan. Line the inner sides with a 4-inch acetate cake collar or a tall strip of aluminum foil overlapping itself to create a mold for mousse layers. Place a cake board in the bottom to facilitate removal.
- Make the First Mousse Layer: In a microwave-safe bowl, combine 9 oz white chocolate chips, 3/4 cup cream, and 1/2 tsp salt. Microwave in 30-second intervals, stirring in between until smooth. Allow to cool to room temperature while preparing the gelatin.
- Prepare Gelatin: In a small bowl, whisk together 2 tsp powdered gelatin and 2 TBSP cold water. Let it absorb water for a few minutes, then microwave just long enough to melt (10-15 seconds). Whisk the melted gelatin into the cooled white chocolate mixture with 1/2 tsp peppermint extract.
- Whip and Fold Cream: Whip 1 cup heavy cream to firm peaks. Fold half into the white chocolate mixture gently, then fold in the remaining whipped cream. Stir in 2/3 cup Andes peppermint bits carefully to distribute evenly.
- Assemble First Mousse Layer: Place one chocolate cake layer on the cake board in the pan, then smooth the mousse on top in an even layer. Refrigerate 15 minutes until mousse begins to set and is firm enough to hold the next layer.
- Repeat for Second Layer: Place the second cake layer on top of the chilled mousse. Repeat the mousse making and spreading process to cover the top. Refrigerate for 5-6 hours or overnight until the mousse is fully set and firm.
- Make the Ganache: Remove the cake from the pan by pushing out the bottom or releasing the sides and unwrap the acetate. On a small bowl, pour hot cream (heated to a simmer) over 3 oz chopped semi-sweet chocolate. Whisk gently until smooth and glossy.
- Glaze and Decorate: Pour the ganache over the mousse layer and spread gently towards edges allowing drizzles to drip. Let it sit for 10 minutes to slightly set. Decorate with assorted peppermint candies such as bark shards, candy canes, lollipops, and ribbon candy. Add candy no more than 1-2 hours before serving to avoid stickiness.
- Serving: For neat slices, chill the cake well before cutting. Use a large sharp knife and clean it between slices. Let cake slices stand at room temperature 10-15 minutes before serving for best texture and flavor.
Notes
- Ensure butter, eggs, and buttermilk are at room temperature for best cake texture.
- The acetate cake collar or foil lining prevents mousse from sticking to the pan sides, enabling clean removal.
- Gelatin must be fully dissolved and incorporated for mousse to set properly.
- Andes peppermint crunch bits add texture and peppermint flavor; substitute with similar peppermint chocolate bits if unavailable.
- Allow mousse layers to chill well for easy assembly and cutting.
- Decorate with peppermint candies shortly before serving to keep them crisp and avoid stickiness.
- Storing: Cake can be stored covered in the refrigerator up to 3 days.
Keywords: Candy Cane, Mousse Cake, Holiday Dessert, Chocolate Peppermint Cake, Christmas Cake, White Chocolate Mousse