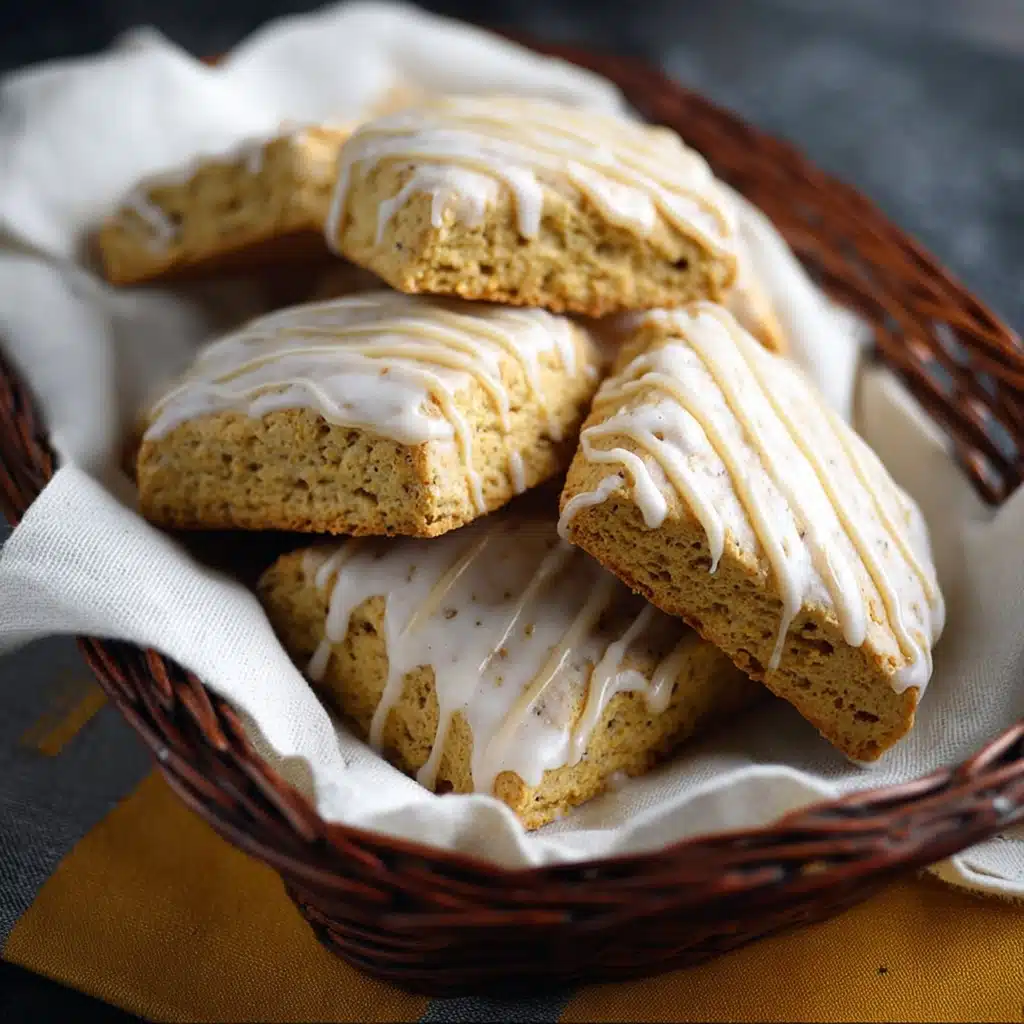
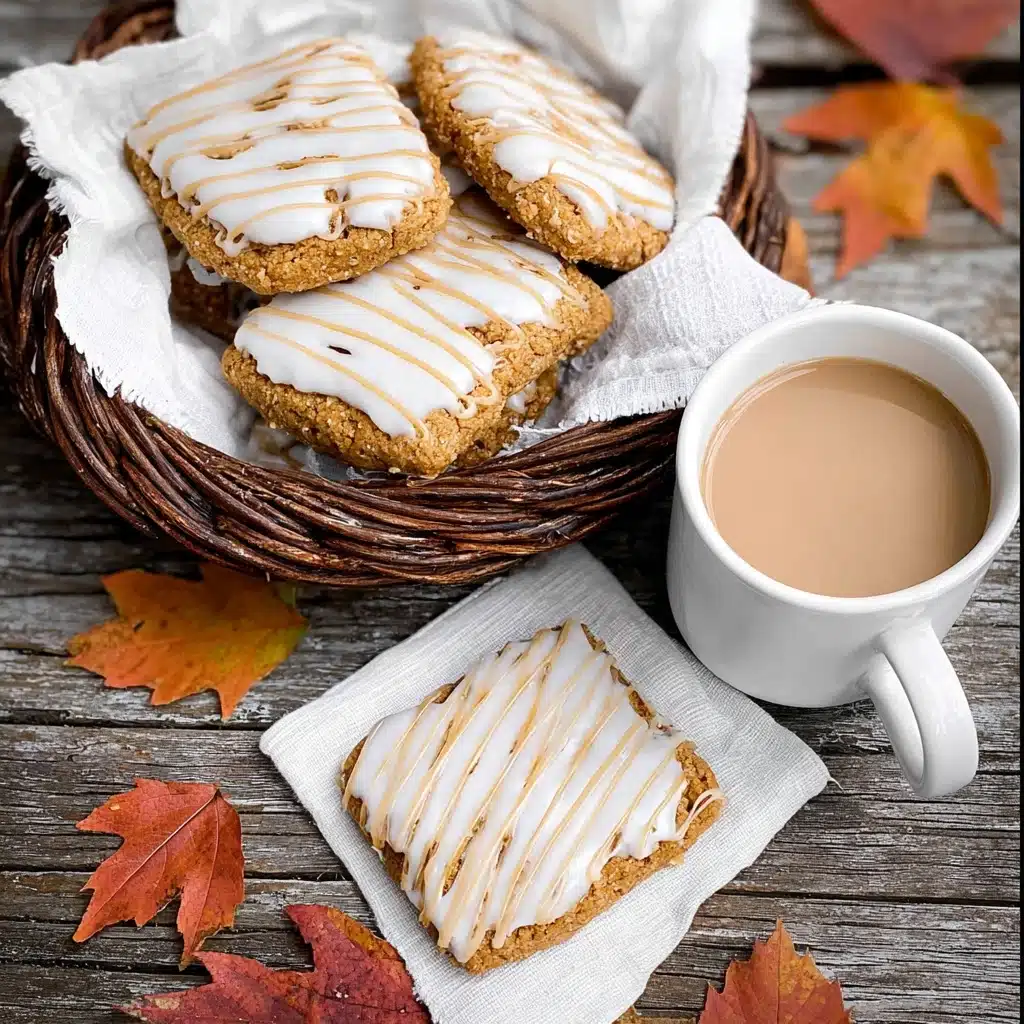
Better-Than-Starbucks Pumpkin Scones Recipe
If you’ve ever found yourself longing for that cozy pumpkin spice treat with flaky, tender crumb and just the right amount of sweetness, you’re going to adore this Better-Than-Starbucks Pumpkin Scones Recipe. It captures all the warmth and spice of fall, swirling with cinnamon, nutmeg, and a subtle clove kick, draped in a luscious vanilla-cinnamon glaze that’s smooth and just sweet enough. These scones bake up beautifully golden and fresh, with a buttery texture that rivals your favorite coffee shop’s fall indulgence — all from your own kitchen!
Ingredients You’ll Need
The magic of this Better-Than-Starbucks Pumpkin Scones Recipe is in the simplicity and quality of its ingredients. Each one plays a crucial role—from the flour pulsing with structure to the pumpkin puree that gives richness and moisture, and the perfect blend of spices evoking comfort. Let’s break down the essentials you’ll want on hand:
- All-purpose flour (2 cups): Provides the base and structure for tender, flaky scones.
- Granulated sugar (1/2 cup): Adds subtle sweetness without overpowering the spices.
- Fine-grain sea salt (1/2 teaspoon): Enhances all the flavors, balancing sweetness and spice perfectly.
- Baking powder (2 teaspoons): Helps the scones rise for that light, fluffy texture.
- Baking soda (1/2 teaspoon): Works together with acidity from pumpkin for optimal rise and browning.
- Ground cinnamon (2 teaspoons): The star spice that brings warm, comforting aroma and taste.
- Freshly ground nutmeg (1 teaspoon): Adds complexity and depth to the spice blend.
- Ground ginger (1/2 teaspoon): Brings a little zing and complements the other fall spices.
- Ground cloves (1/4 teaspoon): Adds subtle warmth and richness without overpowering.
- Solid coconut oil (1/3 cup): For tender, flaky layers and a slight tropical aroma (*can substitute with cold unsalted butter).
- Canned pumpkin puree (1/2 cup): The moist, flavorful heart of autumn that keeps these scones soft and luscious.
- Full-fat coconut milk (1/4 cup): Provides creaminess and moisture, enhancing richness (dairy milk works too).
- Large egg (1): Binds ingredients and adds richness for tender crumb.
- Powdered (confectioners) sugar (1 cup): For the silky smooth vanilla glaze that finishes each scone.
- Water (2 tablespoons): Helps achieve the perfect glaze consistency.
- Vanilla extract or bean paste (1/2 teaspoon): Adds aromatic sweetness to the glaze.
- Ground cinnamon and turmeric (1/4 teaspoon each): Whisked into a small portion of glaze for that signature cinnamon drizzle.
How to Make Better-Than-Starbucks Pumpkin Scones Recipe
Step 1: Prep Your Oven and Pan
Start by heating your oven to a toasty 425 degrees Fahrenheit. Line a baking sheet with parchment or a silicone mat to keep your scones from sticking and to promote even browning. Having everything ready at this stage makes the process smoother as you move forward.
Step 2: Combine the Dry Ingredients
In a large bowl, whisk together the flour, sugar, sea salt, baking powder, baking soda, cinnamon, nutmeg, ginger, and cloves. This spice-packed base sets the tone for the whole scone, blending all the autumn flavors beautifully.
Step 3: Cut in the Coconut Oil
Add your solid coconut oil to the dry mixture. Using a pastry blender or two knives, cut the oil into the flour until it resembles coarse crumbs about the size of peas. This step is key to the flaky texture and buttery mouthfeel you’re aiming for in these scones.
Step 4: Mix Wet Ingredients
In a separate bowl, whisk together the pumpkin puree, coconut milk, and egg until smooth. These wet ingredients bring moisture, richness, and that quintessential pumpkin flavor that makes this Better-Than-Starbucks Pumpkin Scones Recipe so unforgettable.
Step 5: Combine Wet and Dry
Pour the wet ingredients into the dry mixture and use a wooden spoon or spatula to gently mix just until it begins to come together. Turn the dough onto a lightly floured surface and gently knead just enough to form a cohesive dough—that tender balance between a bit wet but not sticky is what you want.
Step 6: Shape and Cut the Dough
Press the dough into an approximately 7-inch square about 1 inch thick. Cut the square in half, then each half into three rectangles, for six scones total. This classic shape gives you plenty of crusty edges to love and plenty of surface area for glazing.
Step 7: Bake to Golden Perfection
Arrange the rectangles on your prepared baking sheet with a little space between them. Bake for about 15 minutes until the scones puff up, the tops turn light golden brown, and they look slightly dry in the cracks. That golden exterior with soft interior is what makes these scones extraordinary.
Step 8: Cool and Glaze
Let the scones cool completely on a wire rack—you want the perfect balance between fresh warmth and set glaze. Meanwhile, mix your powdered sugar, water, and vanilla extract into a silky icing. Brush it generously over the scones, then create the cinnamon icing by adding cinnamon and turmeric to some reserved glaze. Pipe delicate lines atop for that signature look and flavor burst.
How to Serve Better-Than-Starbucks Pumpkin Scones Recipe
Garnishes
Refreshing garnishes can make your pumpkin scones pop. Consider sprinkling a tiny pinch of coarse sugar on top before baking for added sparkle and crunch, or scatter a few chopped pecans or walnuts over the glaze before it dries. A light dusting of powdered sugar just before serving adds a delicate powdery kiss that looks like early morning frost.
Side Dishes
These pumpkin scones pair beautifully with a hot cup of coffee, chai tea, or even a latte made just the way you like it. For a cozy brunch, serve alongside fresh fruit like sliced apples, pears, or a small bowl of cinnamon-spiced yogurt. The creamy, fruity elements balance the spice and sweetness of the scones perfectly.
Creative Ways to Present
For a charming presentation, stack a few scones on a rustic wooden board or a pretty plate lined with a linen napkin. Drizzle extra glaze in artistic swirls on the plate and garnish with a cinnamon stick or fresh pumpkin pie spice sprinkle. Serve with mini jars of honey or jam to add a touch of personalized sweetness for your guests or family.
Make Ahead and Storage
Storing Leftovers
Your Better-Than-Starbucks Pumpkin Scones Recipe will stay fresh at room temperature for up to 3-4 days if kept in an airtight container. This way, the scones retain their tender crumb and don’t dry out, making them perfect for a grab-and-go breakfast or snack.
Freezing
If you want to enjoy your pumpkin scones longer, wrap each scone tightly in plastic wrap and place them in a freezer-safe bag or container. They can be frozen for up to 2 months without losing flavor or texture. This trick saves you time and keeps your pumpkin fix ready at any moment.
Reheating
To reheat, allow frozen scones to thaw at room temperature or warm them gently in the oven at 325 degrees Fahrenheit for about 7-10 minutes until heated through but not dried out. You can refresh the glaze slightly by brushing it with a little warmed milk or water if needed. Avoid microwaving, as it can make the scones rubbery.
FAQs
Can I substitute butter for coconut oil?
Absolutely! Butter works wonderfully in this recipe and offers a more traditional scone flavor. Just make sure to use cold, solid butter and cut it into the flour similarly for that flaky texture.
Is canned pumpkin puree necessary?
Using canned pumpkin puree is recommended for its smooth consistency and rich flavor. Fresh pumpkin can be used but should be cooked and pureed thoroughly beforehand to capture the right moisture level.
Can I make these scones vegan?
Yes! Replace the egg with a flax egg (1 tablespoon ground flaxseed mixed with 3 tablespoons water) and ensure your coconut milk is full-fat for richness. Also, confirm your powdered sugar is vegan-friendly.
How do I know when the scones are perfectly baked?
They should be golden brown on top, puffed slightly, and dry-looking around the edges and cracks. Touching the top should feel firm but not hard. This signals a tender interior with a crumbly crust.
Can I use regular milk instead of coconut milk?
Definitely! Any full-fat milk or cream can substitute full-fat coconut milk. The scones will still be tender and flavorful, just with a slightly different taste profile.
Final Thoughts
There’s something incredibly satisfying about baking your own pumpkin scones that taste even better than those from the coffee shop. This Better-Than-Starbucks Pumpkin Scones Recipe is cozy, flavorful, and just the right combination of tender and spiced goodness, perfect for fall mornings or anytime you want a little pumpkin joy. I can’t wait for you to try this recipe and make these scones your new seasonal favorite!
PrintBetter-Than-Starbucks Pumpkin Scones Recipe

These Better-Than-Starbucks Pumpkin Scones are the perfect fall treat, combining warm spices, rich pumpkin flavor, and a luscious coconut milk base. Lightly sweetened and topped with a vanilla glaze and a cinnamon-turmeric drizzle, these scones are tender, flaky, and irresistibly delicious—ideal for breakfast, brunch, or an afternoon snack.
- Prep Time: 15 minutes
- Cook Time: 15 minutes
- Total Time: 30 minutes
- Yield: 6 scones 1x
- Category: Breakfast, Snack, Dessert
- Method: Baking
- Cuisine: American
- Diet: Vegan
Ingredients
Dry Ingredients
- 2 cups all-purpose flour (+ a little more for shaping/cutting)
- 1/2 cup granulated sugar
- 1/2 teaspoon fine-grain sea salt
- 2 teaspoons baking powder
- 1/2 teaspoon baking soda
- 2 teaspoons ground cinnamon
- 1 teaspoon freshly ground nutmeg
- 1/2 teaspoon ground ginger
- 1/4 teaspoon ground cloves
- 1 cup powdered (confectioners) sugar (for glaze)
- 1/4 teaspoon ground cinnamon (for cinnamon icing)
- 1/4 teaspoon ground turmeric (for cinnamon icing)
Wet Ingredients
- 1/3 cup solid coconut oil
- 1/2 cup canned pumpkin puree
- 1/4 cup full-fat coconut milk
- 1 large egg
- 2 tablespoons water (for glaze)
- 1/2 teaspoon vanilla extract (vanilla bean paste or vanilla bean powder can be used)
Instructions
- Preheat Oven and Prepare Baking Sheet: Preheat your oven to 425°F (220°C). Line a baking sheet with a Silpat mat or parchment paper and set aside.
- Mix Dry Ingredients: In a large mixing bowl, combine the all-purpose flour, granulated sugar, fine-grain sea salt, baking powder, baking soda, cinnamon, freshly ground nutmeg, ground ginger, and ground cloves. Stir everything together until evenly mixed.
- Cut in Coconut Oil: Add the solid coconut oil to the dry ingredients. Using a pastry blender, two butter knives, or your hands, work the coconut oil into the flour mixture until it resembles coarse crumbs with some pea-sized bits.
- Whisk Wet Ingredients: In a medium bowl, whisk together the pumpkin puree, full-fat coconut milk, and the large egg until smooth and well combined.
- Combine Wet and Dry: Pour the wet ingredients over the dry crumb mixture. Using a wooden spoon or spatula, stir just until the dough begins to come together. It should still be a bit shaggy.
- Shape the Dough: Turn the dough out onto a floured surface to prevent sticking. Gently finish mixing if needed, then shape into roughly a 7 x 7 inch square about 1 inch thick. If the dough feels too sticky, add a little more flour to reach the right consistency.
- Cut into Rectangles: Cut the square dough in half, then cut each half into three equal rectangles (total of six rectangles).
- Arrange on Baking Sheet: Place the cut scones onto the prepared baking sheet with some space between them.
- Bake: Bake in the preheated oven for about 15 minutes, or until the scones are puffed up, lightly browned on top, and appear dry in the cracks when closely inspected.
- Cool: Remove the scones from the oven and transfer them to a wire rack to cool completely before glazing.
- Prepare the Vanilla Glaze: In a small bowl, mix together the powdered sugar, water, and vanilla extract. Stir continuously until the glaze is smooth and spreadable. Adjust consistency by adding more water if too thick, or more powdered sugar if too thin.
- Glaze the Scones: Use a pastry brush to generously spread the vanilla glaze over each cooled scone. The glaze may appear thick initially but will smooth out beautifully.
- Make Cinnamon Icing: Reserve 3 tablespoons of the vanilla glaze in a separate small bowl. Stir in the ground cinnamon and turmeric thoroughly. Transfer this mixture into a small plastic baggie, snip a tiny corner tip, and drizzle it decoratively over the glazed scones.
- Enjoy or Store: Enjoy the scones immediately or allow the glaze to harden a bit before serving. Store scones at room temperature in an airtight container for 3-4 days for optimal freshness.
Notes
- Use solid coconut oil at room temperature to achieve the correct crumb texture.
- Full-fat coconut milk is preferred for richness and moisture; avoid light or reduced-fat versions.
- Vanilla bean paste or vanilla bean powder can be swapped with vanilla extract for a more intense vanilla flavor.
- Handle the dough gently to avoid overworking, which can make scones tough.
- The turmeric in the cinnamon icing adds a subtle earthiness and a warm hue, but can be omitted if desired.
- Scones are best enjoyed fresh but will keep for 3-4 days at room temperature.
- For a dairy-free and vegan option, this recipe already uses coconut milk and oil instead of butter and dairy milk.
Nutrition
- Serving Size: 1 scone
- Calories: 280
- Sugar: 15g
- Sodium: 270mg
- Fat: 12g
- Saturated Fat: 9g
- Unsaturated Fat: 3g
- Trans Fat: 0g
- Carbohydrates: 38g
- Fiber: 3g
- Protein: 4g
- Cholesterol: 0mg
Keywords: pumpkin scones, vegan pumpkin scones, gluten free alternative scones (note: original is not gluten free), fall recipes, pumpkin spice, coconut milk scones, easy scones, homemade scones, holiday baking